Metroboard X User Guide
This guide applies to original Metroboard X (2018-2021) using the MESC4 and MESC6. Learn how to program your ESC to adjust settings using VESC TOOL, Stormcore, or XMATIC.
The manuals for the Metroboard X.o and Metroboard X22 are here.
Basic Operation
- Turn the remote on by holding the right power button for a few seconds. Turn off by doing the same.
- Push the thumbwheel out on the remote out to accelerate, and pull it in to brake. Note that the board goes in reverse automatically after braking (pulling thumbwheel in) and coming to a near stop, so be careful. To counter reverse you need to accelerate (push thumbwheel out). This is completely symmetric. In other words you can ride in reverse exactly as you do going forward. If you don’t want to go in reverse, you can just let go of the thumbwheel after coming to a stop. You can “yoyo” your position by gently moving thumbwheel in/out.
- Note the 4 lights on the remote display “board battery level” (1-4 red lights)
- To check remote battery level, press the power switch on the remote twice in a row and you will see displayed 1-4 red lights indicating remote battery level. After a few seconds, the display will return to “board battery level”.
- The button to the left of the power switch can be clicked to enable/disable the board lights. Note on boards shipped after 09/24/2020, there are 3 brightness levels to the front lights. When the board is powered ON, it starts out at the LOW brightness level. Press the lights button and the lights will turn off. Press it again and the lights will turn back on at the MEDIUM brightness level. Press it again and the lights will turn back off. Press it again and the lights will turn back on at the HIGH brightness level. Repeating this process will start back over at the LOW brightness level. Note on boards shipped after 12/10/2020, the board lights will not turn on till after the remote is turned on and the accelerator/thumbwheel is used for the first time.
- After 2 minutes of inactivity (with the board turned OFF), the remote will automatically power off
- After 5 minutes of inactivity (with the board turned ON), the remote will automatically power off
- Remote battery life is estimated at about 6 hours so plan/charge accordingly. When remote battery is low, the green light on the bottom will start flashing green, and the remote may vibrate as well. At this point, you should charge the remote ASAP, because you may start to experience wireless glitches which could result in you losing the ability to accelerate or brake!
- The remote is charged with a USB micro cable. The red light on the remote will come on while charging the remote, and will turn off when fully charged. Charge time is typically around 2 hours if fully drained.
- Note on boards shipped after 12/10/2020: when plugging the charger in, the board will turn on automatically while charging so you can see the battery level on the board battery display on the rear truck plate. Do not attempt to use the remote while the board is charging as the board may end up moving!
Switching between AT and Street Wheels
This tutorial will show you how simple it is to change between Street and AT wheels on the new MetroboardX Electric Skateboard! In 15 minutes or less you can easily swap between wheel types depending on your riding style and the terrain you plan on riding. We designed the MetroboardX Electric Longboard to be super user-friendly so that even the “technically-challenged” can easily maintain their board. One example is the built in automatic belt tensioner that makes swapping out wheels and replacing belts a breeze for even the novice rider! This is just one of the many easy to use features on the MetroboardX Electric Skateboard!
Tools needed for this tutorial:
- 17 mm Socket Driver (for wheel axle nuts)
- 8 mm Nut Driver (for handle and motor mounting screws)
- 3 mm Allen (for transmission cover screws)
- M5 x 35 mm long Hex Cap Screw (for belt tensioning mechanism)
Configuring the App (for boards shipped AFTER 09/24/2020)
There are apps to view telemetry data and change settings. Please check with us before making any changes in settings.
For Android
Use VESC TOOL.
WATCH VIDEO SHOWING HOW TO USE THIS APP. DO NOT MAKE CHANGES TO POWER SETTINGS BEYOND THOSE SHOWN IN VIDEO BELOW.
THE DEFAULT MOTOR AND BATTERY CURRENT SETTINGS SHOULD NOT BE ADJUSTED WITHOUT CONSULTING WITH US FIRST.NEVER SET BATTERY MAX CURRENT AT GREATER THAN 30 AMPS!
WHEEL SIZE / GEARING SETUP
 |
 |
 |
 |
 |
| 200mm AT Wheel Setup 72 tooth pulley (28 MPH) | 200mm AT Wheel Setup 52 tooth pulley (36 MPH) | 155mm AT Wheel Setup (31 MPH) | 120 mm Cloudwheel Setup (35 MPH) | 107 mm Abec11 Flywheel Setup (31 MPH) |
POWER / SPEED PROFILES
 |
 |
 |
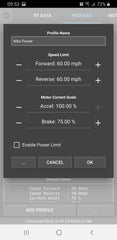 |
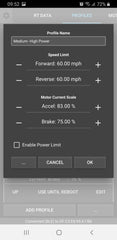
| Default Power Profile | 10 mph Profile (EXAMPLE) | Medium – High Power Profile | Max Power Profile |
For iPhone
Use Stormcore. See video below for installation and setup of the app. Note the following settings:
Configure Battery
- Min Cell Voltage: 3.0 V
- Max Cell Voltage: 4.2V
- Cells in Series: 10
Configure Drive Train
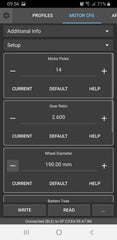
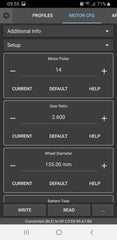
- KV Motor: 130
- Pole Motor: 14
- Motor Teeth: 20
- Wheel Diameter / Wheel Teeth (depending on wheels/pulleys being used)
- 200mm (AT) / 72 tooth (28 mph top speed) DEFAULT
- 200mm (AT) / 52 tooth (36 mph top speed) OPTIONAL HIGH SPEED
- 155mm (AT) / 52 tooth (31 mph top speed)
- 120 mm (Cloudwheels) / 36 tooth (35 mph top speed)
- 107 MM (Abec11) / 36 tooth (31 mph top speed)
NOTE THAT CURRENTLY, VESC MOTOR POWER (E.G., ACCEL AND BRAKING) AND SPEED LIMITING CANNOT BE CHANGED VIA THE STORMCORE APP, BUT SHOULD BE AVAILABLE IN THE FUTURE. IF YOU WANT TO CHANGE POWER SETTINGS, PLEASE USE THE ANDROID APP “VESC TOOL” ABOVE (EVEN IF YOU ARE JUST BORROWING SOMEONE’S ANDROID PHONE YOU CAN DO THIS AND MAKE THE CHANGES TO POWER SETTINGS PERMANENT, THEN GO BACK TO STORMCORE FOR TELEMETRY DATA)
Configuring the App (for boards shipped BEFORE 09/24/2020)
For Android
- Turn on your MetroboardX.
- Enable Bluetooth on your phone, start app, and allow all permissions.
- On initial screen, you should see the name “HMSoft” in list of BT modules in RED. The RED indicates the module is connected. If it doesn’t show up, try hitting the “Scan” Button. Click on it and you can rename it to whatever you want. For example “MetroX”. Sometimes there will be disconnects from the module, but you can return to this screen to reconnect as needed.
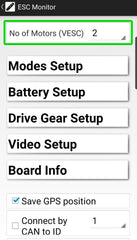
- Click on the “Pencil Icon” at the top of the screen (if connected to module). If not connected, you will automatically be taken to “Basic Configuration” Screen.
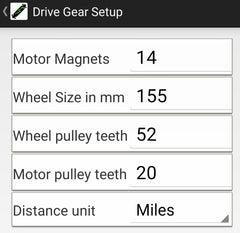
- See screen shots below which show the basics of how to use these apps and how to configure. It’s critical that you setup the “Basic Configuration” exactly as shown in screenshot. Note that you should list “No of Motors (VESC): 2” and “Connect by CAN to ID, should be UNCHECKED”.
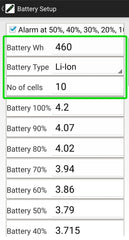
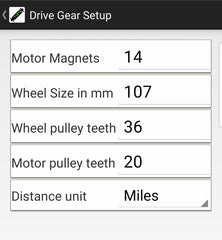
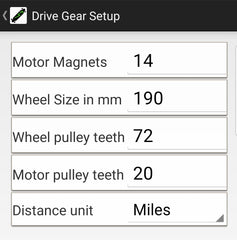
- Also Follow “Battery Setup”, “Drive Gear Setup”, and “Example Modes” (if you want to experiment with this)
- THE DEFAULT MOTOR AND BATTERY CURRENT SETTINGS SHOULD NOT BE ADJUSTED WITHOUT CONSULTING WITH US FIRST.NEVER SET BATTERY MAX CURRENT AT GREATER THAN 30 AMPS!
|
 |
 |
 |
 |
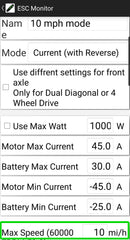 |
| Basic Configuration | Battery Setup | Drive Gear Setup 107 mm Street Wheels | Drive Gear Setup 200mm All Terrain Wheels | Drive Gear Setup 155mm All Terrain Wheels | Example 10 mph Mode Settings (limits speed to 10 mph) |
Applying New Modes (Android)
Watch this video showing to apply a new mode using ACKMANIAC-ESC Monitor:
For iPhone
Use Xmatic.
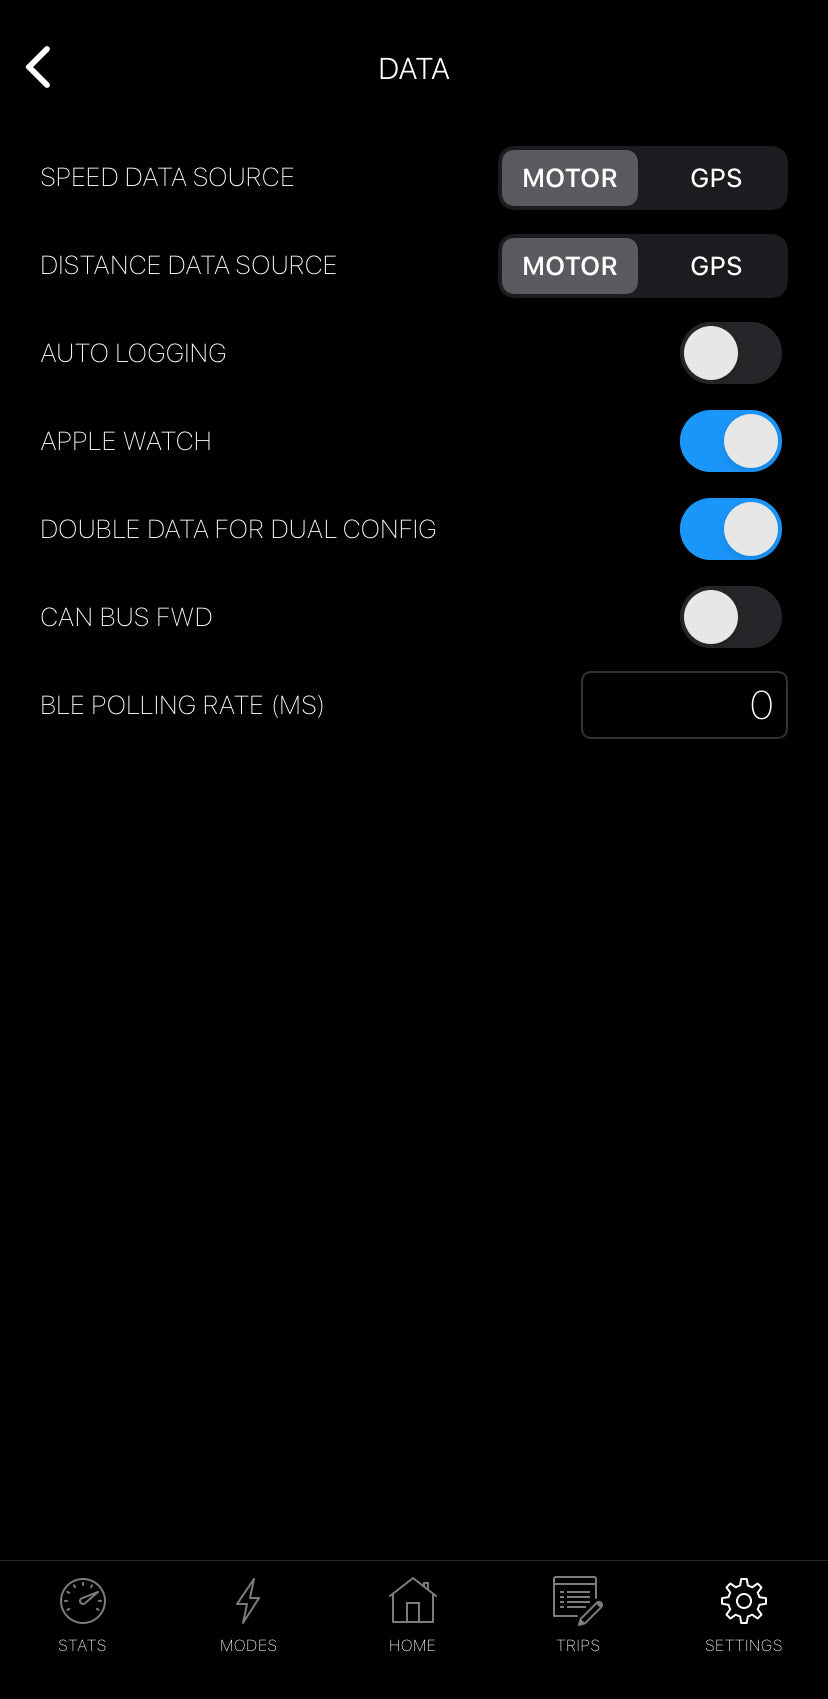
Settings should be set as shown below. NOTE: DO NOT ATTEMPT TO USE THE MODE FEATURE IN XMATIC AS IT IS BUGGY AND CAN RESULT IN INCORRECT PROGRAMMING.
Turn on the setting for Dual Config. Also, if you have an Apple Watch, you can get telemetry on your wrist! |
 |
 |
 |
 |
|
Battery Setup |
Drive Gear Setup 107 mm Street Wheels |
Drive Gear Setup 200mm All Terrain Wheels |
Drive Gear Setup 155mm All Terrain Wheels |
Turn on the setting for Dual Config. Also, if you have an Apple Watch, you can get telemetry on your wrist! |
Maintenance
Rebinding a New Remote
If you need to rebind a new remote to your MetroboardX follow the procedure below:
- Make sure the board is turned off.
- Power on the NEW remote.
- On the NEW remote, hold down both the power button and the lights button (the button to the left of the remote power button) simultaneously for a few seconds till the remote starts vibrating and the top red light on the remote starts flashing rapidly.
- Now power on the board and you should see the red light on the remote become solid, indicating the remote is now paired. If not, return to step 1 above.
Resetting Remote Battery Level
If the 4 LEDs on the remote seem to be reporting the wrong board battery level, you may have accidentally changed the battery calibration for the remote. To correct this, follow the procedure below:
- Power on the remote (board does not need to be on).
- On the remote, press and hold the lights button (the button to the left of the remote power button) for a few seconds till you see the battery level lights on the remote flashing (should be 1-4 lights flashing).
- If you see 3 lights flashing, your remote is set correctly. If not, quickly press the lights button repeatedly till you see 3 lights flashing. Then hold the lights button for a few seconds to store the new setting, and you will see the flashing remote lights turn to solid or off (if the board is turned off).
NOTE: To avoid accidentally changing this setting, when turning on/off the board lights via the remote, be sure to just press the lights button briefly. Otherwise, you may mistakenly get into the battery level setting mode above.
Retightening Loose Motor Pulleys
In some cases your motor pulleys may come loose from the motor shaft due to heavy vibration. If this is the case you may hear a clicking sound when starting and stopping. Follow these instructions to retighten your motor pulleys.
Tool List
Below you will find the list of tools you will need to do basic maintenance and (less frequent maintenance):
Basic Maintenance Tool List (needed for swapping between Street and AT wheels/changing belts/pulleys)
- 17 mm socket/nut driver (axle nuts)
- 8 mm socket/nut driver (belt tension release screws and motor slide screws)
- 3 mm allen driver (transmission cover screws)
- 9/16″ socket/nut driver or “skate tool” (kingpin nuts)
Less Common Tool List
- 2.5 mm allen driver (deck lid screws / motor pulley set screws / LED lens cover screws)
- 4 mm allen driver (motor mounting screws). Note some motors use a 3 mm allen driver.
- 1/8″ allen driver (truck mounting screws)
- 3/8″ socket/nut driver/open wrench (truck mounting nuts)
- 3 mm allen driver (strain relief screws for LED cables / AT wheel hub screws)
- 7 mm socket/nut driver (AT wheel hub nuts)
- T6 (torx) driver (LED PCB mounting screws)
Upgrading to 15 Watt Front Lights
For those customers upgrading to the 15 Watt Front lights on an existing MetroboardX that has our regular lights, follow these installation instructions.